WordPress Menus are used as a method for building navigation within our sites.
When we build your site we will set-up Menus for you. You might find that due to the size of your website there will be multiple Menus to edit.
In this article, you’ll learn how to edit these Menus.
Things to Know
- In the Menu section of WordPress, you’ll see the different things you can add. Pages, posts, custom links and categories should be displayed as default.
- By clicking in the check box next to the item you want to add and then clicking on the “Add to Menu” button, WordPress will add that item to the Menu structure.
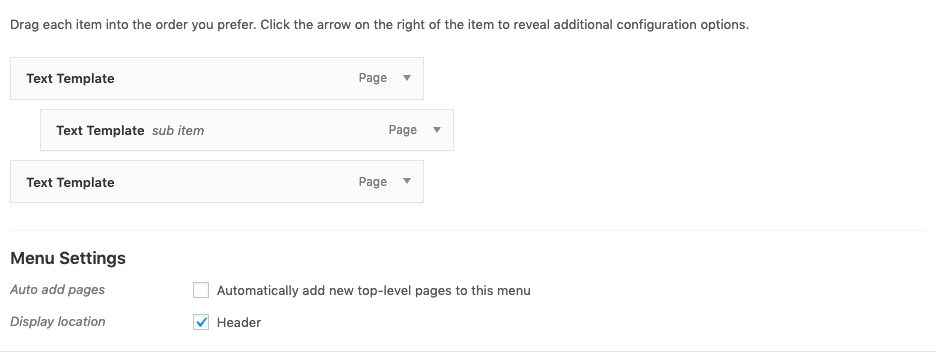
- When editing or creating a new Menu, WordPress offers a form of drag-and-drop that lets you modify the order of the Menu links.
- If there is something you need to remove, a small drop-down arrow is available on the top right of each added Menu item. When this is clicked, there is a link to Remove an item from the Menu.
Finding a Menu
To find a Menu, follow these steps.
- Hover over the Appearance link to the left of your Dashboard and click the Menu link.
- As we have already created the menus for you, these can be found in a drop down menu next to the text Select a menu to edit.

- Choose the Menu you want to change, if it is not already selected, and the menu will start loading once you click Select.
Adding Links to a Menu
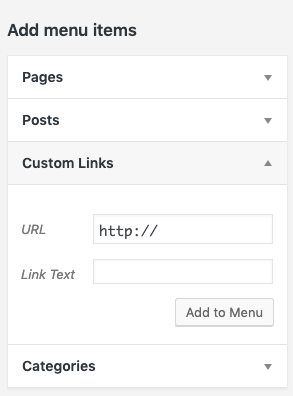
- To the left of the Menus page is an area titled Add menu items.

- Select the pages, categories or posts you want to show in your menu by selecting the checkbox next to the item you want to add and click Add to menu.
- The items will now appear on the right side of your screen in your selected Menu. You can also drag the items around to appear in the right order. Click on Save Menu to save your changes.

Editing Links in a Menu
- Next to every Menu link, you can see the item type Page, Category, or Message.
- You can change the display order of each Menu link by clicking and dragging the items up or down.
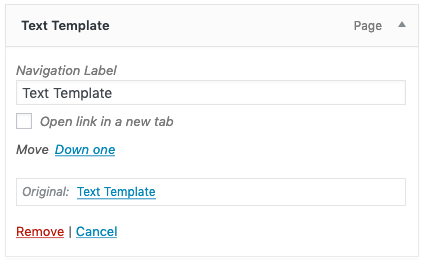
- On the right side of each Menu link, you will see a small triangle. When you click this, a column with several options will unfold:

Navigation Label
Enter the text you want on your menu link.
Title Attribute
This is the text that appears in a tooltip when you move your mouse over the menu item. This is not a mandatory field, but it is usually filled out to increase search engine friendliness.
Link Target
Where do you want this link to open? You can choose between Same window or tab or New window or tab. This will only show if you have enabled it in Screen options.
Remove
Click here to remove the menu item. - When you are happy with your changes, click Save Menu.
Adding a Link to an External Site
Sometimes you want to create a link to another website in your menu. For instance, a login button linking to a login page outside of the website.
- Click on Custom links under Add menu items

- In the field URL add the web address and under Link text enter the name you want on the Menu link.
- Click Add to Menu. Now you can drag the item to the desired place on the right.
- Often you want a link to an external website to open in a new window. So, remember to also check Open link in a new tab under Link target.
- When you are happy with your changes, click Save Menu.
Adding a Sub Menu
Some of our themes are set up to handle Sub Menus. This works the same way as adding a normal Menu link. But when you drag the Link to its desired place, you drag it a little more towards the right, under the desired Link.