Accessing the Unsplash Tab
The Unsplash tab (labeled “Stock Images”) lives in the Media Library modal. You can open it from:
- Add Media when editing a post or page
- Site Editor or Block Editor when inserting an image block and choosing “Media Library”
- Media → Library in the admin menu, then “Add New” (or any flow that opens the media modal)
Finding the Tab
- Open the Media Library using one of the flows above.
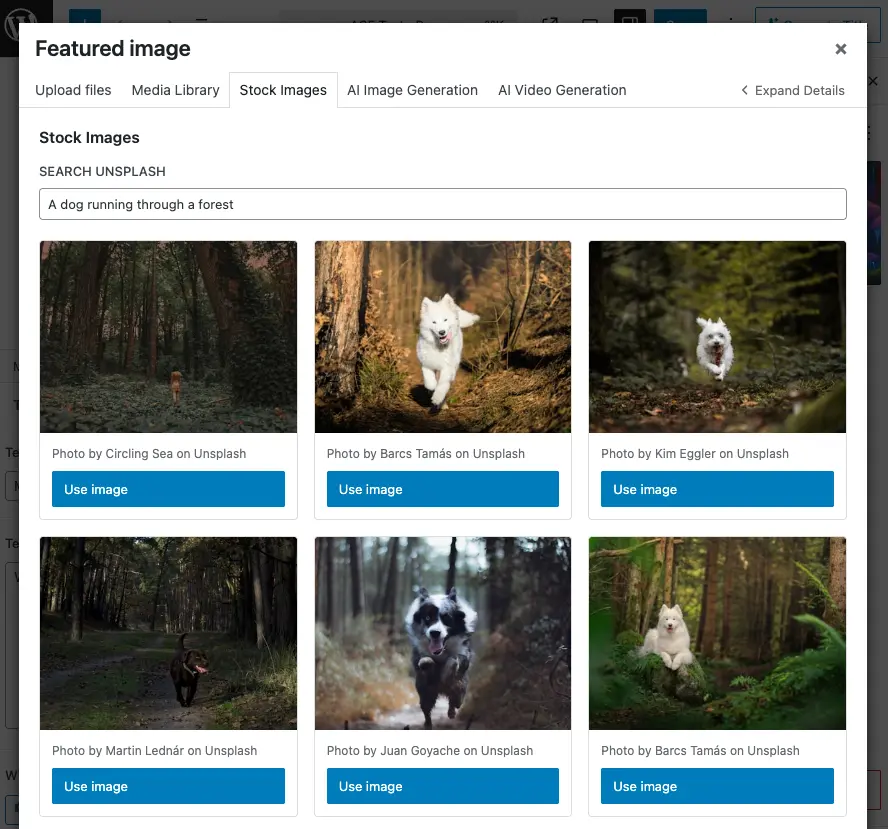
- Check the top tabs – You’ll see “Media Library”, “Stock Images”, “AI Image Generation”, and “AI Video Generation”.
- Click “Stock Images” – The tab shows the search field and image grid.
If you don’t see the Stock Images tab:
- Ensure your Unsplash API key is configured: Cortex AI → Settings → Unsplash, then add your API key and save.
- Confirm you have Manage options (typically Administrator).
- Refresh the page after changing settings.
Setting Up Your Unsplash API Key
Before you can search and import images, you need a free Unsplash API key.
Getting an API Key
- Visit Unsplash Developers and sign in (or create an account).
- Create a new application – Click “New Application” and fill in the details (name, description, etc.).
- Copy your Access Key – After creating the app, you’ll see your “Access Key”. Copy it.
- Add it to WordPress – Go to Cortex AI → Settings → Unsplash and paste the key into the “API Key” field.
- Save – Click “Save Changes”.
The API key is free and allows you to search and download images. Unsplash requires proper attribution (which the plugin handles automatically).
Searching for Stock Photos
The Unsplash tab provides a simple search interface to find images.
Performing a Search
- Enter keywords in the “Search Unsplash” field – Be specific about what you’re looking for (e.g., “mountain sunset”, “coffee shop interior”, “business meeting”).
- Wait for results – The search debounces (waits 500ms after you stop typing) to avoid excessive API calls. A spinner shows “Searching images…” while loading.
- Browse results – Images appear in a responsive grid (3–4 columns depending on screen size), showing 20 results per page.
Search Tips
- Be specific – “modern office workspace” is better than “office”.
- Use descriptive terms – Include style, mood, or setting when relevant (e.g., “minimalist kitchen”, “vibrant city street”).
- Try variations – If you don’t find what you want, try synonyms or related terms.
- Use multiple keywords – Combine terms like “sunset beach palm trees” for more targeted results.
Pagination
If your search returns more than 20 results:
- Previous/Next buttons appear at the bottom of the grid.
- The page indicator shows “Page X of Y”.
- Click to navigate between pages.
- Results persist as you navigate, so you can go back to images you’ve seen.
Previewing Images
Before importing, you can preview any image in full size.
Opening a Preview
- Click “Use image” on any photo in the grid.
- Preview modal opens – Shows the full-size image, photographer attribution, and description (if available).
- Review the image – Check that it matches your needs, fits your content style, and has the right composition.
Preview Information
The preview modal displays:
- Full-size image – The regular resolution version (not the thumbnail).
- Photographer attribution – Name and link to their Unsplash profile.
- Description – The photo’s description or alt description, if provided.
- Unsplash link – Link to Unsplash with proper UTM tracking.
Closing the Preview
- Click Cancel or the X button to close without importing.
- The modal closes and you return to the search grid.
Importing Images
Once you’ve found and previewed an image you want, importing it adds it to your Media Library with proper attribution.
Import Process
- Open the preview – Click “Use image” on the photo you want.
- Click “Import” in the preview modal.
- Wait for import – The button shows “Importing…” while the image downloads and is added to WordPress.
- Success message – When complete, you’ll see “Image successfully added to Media Library!” with two options:
- View in Media Library – Switches to the Media Library tab and selects the new image so you can use it immediately.
- Dismiss – Closes the success message and stays on the Stock Images tab.
What Gets Imported
When you import an image:
- File name – Saved as
unsplash-{photo-id}.jpg. - Title – Uses the photo’s description (if available) or “Photo by {photographer name}”.
- Alt text – Set to the description or title for accessibility.
- Caption – Automatically includes proper attribution with HTML links:
- Link to the photographer’s Unsplash profile (with UTM parameters).
- Link to Unsplash (with UTM parameters).
- Format: “Photo by [Photographer Name] on Unsplash”.
Import Status Indicators
- “Use image” – Available for import.
- “Importing…” – Currently being downloaded and added to WordPress.
- “Imported” – Already imported (button is disabled to prevent duplicates).
The plugin tracks which images you’ve imported in the current session, so you won’t accidentally import the same image twice.
Understanding Unsplash Attribution Requirements
Unsplash images are free to use, but attribution is required by Unsplash’s license. The plugin handles this automatically.
Automatic Attribution
When you import an image, the plugin:
- Adds attribution to the caption – Includes links to the photographer and Unsplash.
- Includes UTM parameters – Tracks usage via
utm_source=wp-ai-plugin&utm_medium=referralfor Unsplash API compliance. - Tracks downloads – Notifies Unsplash when you download an image (required by their API).
Best Practices
- Keep the caption – Don’t remove the attribution caption; it’s required by Unsplash’s license.
- Use the image as-is – You can crop, resize, or edit, but keep the attribution.
- Credit the photographer – The caption links to their profile, which helps photographers get recognition.
Where Attribution Appears
The attribution caption appears:
- In the Media Library when viewing the attachment details.
- When you insert the image into content, if your theme/editor shows captions.
- In the attachment editor under “Caption”.
You can customize how captions display in your theme, but the attribution text should remain in the caption field.
Best Practices
- Set up your API key first – Configure it in Cortex AI → Settings → Unsplash before searching.
- Search specifically – Use clear, descriptive keywords to find relevant images faster.
- Preview before importing – Check the full-size image to ensure it meets your needs.
- Keep attribution – Don’t remove the automatic attribution caption; it’s required by Unsplash.
- Add your own alt text if needed – The plugin sets basic alt text, but you can edit the attachment to add more descriptive alt text for better accessibility.
- Use appropriate images – Choose photos that match your content’s tone, style, and audience.
Troubleshooting
Stock Images Tab Missing
- Confirm your Unsplash API key is set in Cortex AI → Settings → Unsplash and save.
- Ensure you have Manage options (e.g. Administrator).
- Refresh the page after changing settings.
- Check that the Media Library modal is the standard WordPress one (some plugins/themes can override it).
“Unsplash API key is not configured”
- Go to Cortex AI → Settings → Unsplash.
- Enter your Unsplash Access Key (from Unsplash Developers).
- Click “Save Changes” and refresh the Media Library.
“Rate limit exceeded”
- Unsplash has rate limits on API requests. Wait a few minutes and try again.
- If it persists, check your Unsplash application dashboard for rate limit details.
- Avoid rapid, repeated searches; the plugin debounces searches to help prevent this.
Search Returns No Results
- Try different keywords – Be more specific or use synonyms.
- Check spelling – Ensure your search terms are spelled correctly.
- Broaden your search – If too specific, try a more general term.
- Verify API key – Ensure your API key is valid and active.
“Plugin configuration is missing”
- Refresh the page. The script may have loaded before the plugin passed its config.
- If it persists, check that the Cortex plugin is active and no JavaScript errors appear in the browser console.
Images Don’t Show Attribution
- Check the attachment – Edit the image in Media Library and verify the “Caption” field contains the attribution.
- Theme display – Some themes don’t show captions by default; check your theme’s image block or gallery settings.
- Manual check – The attribution is stored in the caption field even if not displayed; you can verify in the attachment editor.
Next Steps
- Generate custom images – Use the AI Image Generation tab to create images from text prompts.
- Create videos – Use the AI Video Generation tab for AI-generated videos.
- Alt text – Enable Automatic Alt Text Generation for new uploads, or run Batch Alt Text Generation for existing images.
The Unsplash integration makes it easy to find professional stock photos and add them to your site with proper attribution, all without leaving WordPress.