Accessing the Plugin Settings
Cortex provides two main configuration pages accessible from your WordPress admin menu:
Main Page
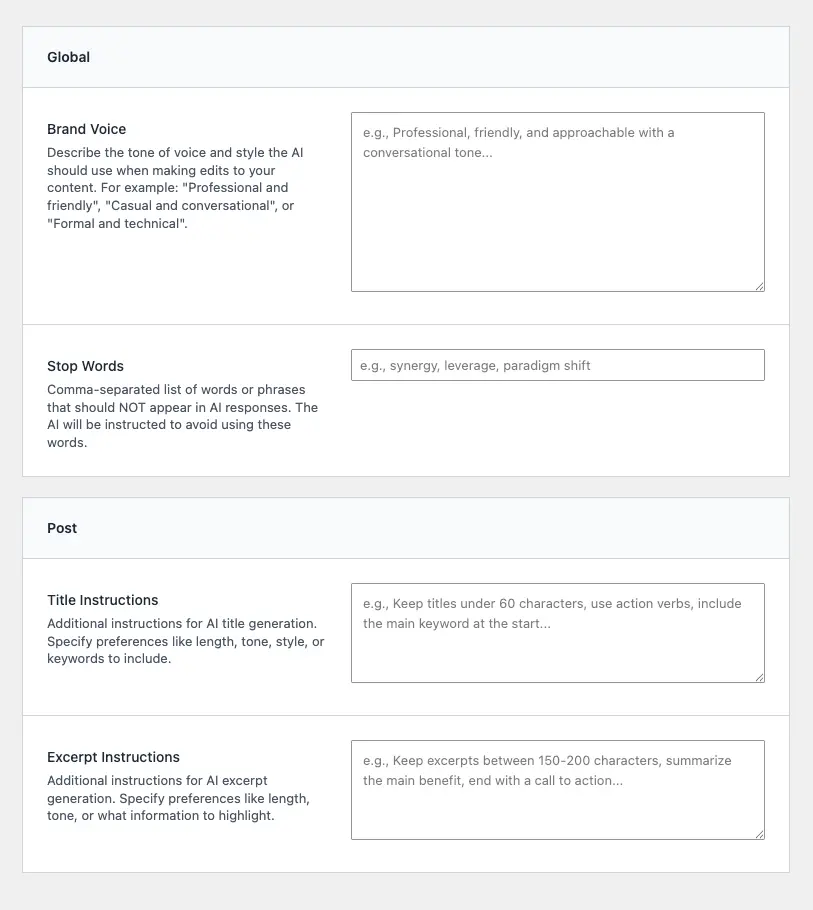
Navigate to Cortex AI in your WordPress admin menu (left sidebar). This page contains:
- Brand voice configuration
- Stop words management
- Title and excerpt generation instructions
- Alt text settings
- Batch alt text processing
Provider Settings
Click on Provider Settings under the Cortex AI menu, or navigate directly to:
WordPress Admin → Cortex AI → Provider Settings
This page is where you configure:
- API keys for each AI provider
- Provider selection for text, image, and video generation
- Model selection for each service type
Note: You must have Administrator permissions (manage_options capability) to access these settings pages.
Setting Up API Keys
The plugin supports multiple AI providers, and you can configure different providers for different tasks. Each provider requires its own API key.
OpenAI
What it supports: Text generation (GPT models), image generation (DALL-E), video generation (Sora)
Getting an API key:
- Visit platform.openai.com
- Sign up or log in to your account
- Navigate to API Keys in your dashboard
- Click Create new secret key
- Copy the key (it starts with
sk-) - Paste it into the appropriate field in the plugin settings
Where to add it:
- Text API Key: Used for text transformations, title/excerpt generation
- Image API Key: Used for DALL-E image generation
- Video API Key: Used for Sora video generation
You can use the same OpenAI API key for all three, but we recommend a different key for each so you can easily manage which API key is costing you what amount in the OpenAI dashboard.
Google Gemini
What it supports: Text generation (Gemini models), image generation, video generation (Veo)
Getting an API key:
- Visit ai.google.dev or makersuite.google.com
- Sign in with your Google account
- Navigate to Get API Key or API Keys section
- Create a new API key or use an existing one
- Copy the key
- Paste it into the appropriate field in the plugin settings
Where to add it:
- Text API Key: Used for text transformations, title/excerpt generation
- Image API Key: Used for Gemini image generation
- Video API Key: Used for Veo video generation
The same Gemini API key can be used for all three services, but we recommend a different key for each so you can easily manage which API key is costing you what amount in the Google Dev dashboard.
Stability AI
What it supports: Image generation only (Stable Diffusion Ultra)
Getting an API key:
- Visit platform.stability.ai
- Sign up or log in to your account
- Navigate to API Keys in your account settings
- Generate a new API key
- Copy the key
- Paste it into the Image API Key field in the plugin settings
Note: Stability AI is only available for image generation. You cannot use it for text or video generation.
Unsplash (Optional)
What it supports: Stock photo search and import
Getting an API key:
- Visit unsplash.com/developers
- Create a free developer account
- Create a new application
- Copy your Access Key (Client ID)
- Paste it into the Unsplash API Key field in the plugin settings
Note: Unsplash integration is optional. You can use AI image generation without an Unsplash key, but you won’t be able to search and import stock photos.
Choosing AI Providers and Models
The plugin allows you to select different providers for different tasks. This flexibility lets you:
- Use the best provider for each task type
- Optimize costs by choosing cost-effective providers
Text Generation
Available Providers:
- OpenAI: GPT-5, GPT-4o, GPT-4, GPT-4 Turbo, GPT-3.5 Turbo
- Google Gemini: Gemini 2.5 Pro, Gemini 2.5 Flash
How to configure:
- Go to Provider Settings page
- In the Text API Configuration section:
- Select your preferred provider from the API Provider dropdown
- Enter the corresponding API key
- Choose a model from the Model dropdown
Recommendations:
- Gemini 2.5 Flash: Fast and cost-effective for most tasks
- Gemini 2.5 Pro: Better quality for complex content
- GPT-4o: Excellent quality, good balance of speed and capability
- GPT-3.5 Turbo: Fastest and most cost-effective OpenAI option
Image Generation
Available Providers:
- OpenAI: DALL-E 3
- Google Gemini: Gemini 2.5 Flash Image
- Stability AI: Stable Image Ultra
How to configure:
- Go to Provider Settings page
- In the Image API Configuration section:
- Select your preferred provider from the API Provider dropdown
- Enter the corresponding API key
- Choose a model from the Model dropdown
Provider-Specific Notes:
- OpenAI DALL-E: Uses fixed size presets (1024×1024, 1792×1024, or 1024×1792)
- Gemini: Generates images matching selected aspect ratios (1:1, 16:9, or 9:16)
- Stability AI: Accepts custom dimensions but converts to closest supported aspect ratio
Recommendations:
- DALL-E 3: Best quality, most consistent results
- Gemini 2.5 Flash Image: Fast generation, good quality
- Stable Image Ultra: Most flexible dimensions, good for custom sizes
Video Generation
Available Providers:
- OpenAI: Sora 2 (Fast), Sora 2 Pro (Quality)
- Google Gemini: Veo 3.1 (Standard), Veo 3.1 Fast, Veo 2.0
How to configure:
- Go to Provider Settings page
- Scroll to the Video API Configuration section:
- Select your preferred provider from the Video API Provider dropdown
- Enter the corresponding API key (can be different from text/image keys)
- Choose a model from the Default Video Model dropdown
Recommendations:
- Sora 2: Fast generation, good for quick previews
- Sora 2 Pro: Higher quality, better for final videos
- Veo 3.1: Good balance of quality and speed
- Veo 3.1 Fast: Fastest option for Gemini
Note: Video generation is asynchronous. Videos can take several minutes to generate, and you’ll need to monitor the status in the Media Library.
Basic Configuration Walkthrough
Follow these steps to get your plugin fully configured:
Step 1: Add Your First API Key
- Navigate to Cortex AI → Provider Settings
- Choose which feature you want to use first:
- Text transformations: Add a text API key
- Image generation: Add an image API key
- Video generation: Add a video API key
- Select a provider from the dropdown
- Enter your API key in the API Key field
- Choose a model from the Model dropdown
- Click Save Changes
Minimum requirement: You need at least one API key to use the plugin. You can add more keys later as needed.
Step 2: Configure Additional Services (Optional)
If you want to use multiple features:
- Add API keys for other services (text, image, or video)
- Select providers and models for each
- Save your changes
Tip: You can use the same provider for multiple services (e.g., OpenAI for both text and images) or mix and match providers based on your needs.
Step 3: Set Up Unsplash (Optional)
If you want to search and import stock photos:
- Go to the Unsplash Configuration section
- Enter your Unsplash Access Key
- Save your changes
Step 4: Verify Your Configuration
After saving your settings:
- For text features: Open a post/page in the Block Editor and look for the AI button in paragraph blocks
- For image features: Open the Media Library and check for the AI Image tab
- For video features: Open the Media Library and check for the AI Video tab
- For Unsplash: Open the Media Library and check for the Unsplash tab
If you see these features, your configuration is working correctly.
Step 5: Configure Brand Voice (Recommended)
While not required, setting up your brand voice will improve AI-generated content:
- Go to Cortex AI (Main Page)
- Scroll to Brand Voice section
- Enter a description of your brand’s voice and tone
- Save your changes
See the Configuring Brand Voice guide for detailed instructions.
Common Configuration Scenarios
Scenario 1: Budget-Conscious Setup
Goal: Use the most cost-effective options
Configuration:
- Text: Gemini 2.5 Flash with Gemini API key
- Image: Gemini 2.5 Flash Image with same Gemini API key
- Video: Skip (or use Gemini Veo 3.1 Fast if needed)
Cost: Lower costs with Gemini’s pricing model
Scenario 2: Maximum Quality Setup
Goal: Best possible output quality
Configuration:
- Text: GPT-4o or Gemini 2.5 Pro
- Image: DALL-E 3
- Video: Sora 2 Pro
Cost: Higher, but produces the best results
Scenario 3: Balanced Setup
Goal: Good quality with reasonable costs
Configuration:
- Text: GPT-4o or Gemini 2.5 Pro
- Image: DALL-E 3 or Gemini 2.5 Flash Image
- Video: Sora 2 (Fast) for quick previews, Sora 2 Pro for final videos
Cost: Moderate, good value for quality
Scenario 4: Multi-Provider Setup
Goal: Use different providers for different strengths
Configuration:
- Text: Gemini 2.5 Pro (fast, cost-effective)
- Image: DALL-E 3 (best image quality)
- Video: Gemini Veo 3.1 (good balance)
Cost: Varies, but allows you to optimize per task
Troubleshooting Configuration Issues
API Key Errors
Problem: “Invalid API key” or authentication errors
Solutions:
- Verify the API key is copied correctly (no extra spaces)
- Check that the key hasn’t expired or been revoked
- Ensure you’re using the correct key format for the provider
- For OpenAI: Keys start with
sk- - For Gemini: Keys are long alphanumeric strings
- For Stability AI: Keys are alphanumeric strings
- For Unsplash: Keys are called “Access Keys”
Missing Features
Problem: AI buttons or tabs don’t appear
Solutions:
- Ensure you’ve added at least one API key
- Check that you’ve selected a provider and model
- Verify you have the correct user permissions (Editor or Author role minimum)
- Clear your browser cache
- Check browser console for JavaScript errors
Next Steps
Once your API keys are configured:
- Set up Brand Voice – See Configuring Brand Voice
- Start Using Text Features – See Using AI in the Block Editor
- Generate Your First Image – See Generating AI Images
The plugin is ready to use once you’ve added at least one API key. You can always return to the settings page to add more providers or change your configuration.